
- Install Git and configure your commit identity with user.name and user.email
- Install stable Android Studio and verify SDK components in the SDK Manager
- Prepare a runtime target (device or emulator) and verify git, java, adb from terminal
Install Git, Android Studio, and SDK
Prepare Git and the Android tooling required to clone, open, and build the course app.
Lesson video is on the way
While you wait, read the full text version below: complete theory, code samples and the hands-on checklist.
Lesson Goals
By the end of this lesson, you will have installed:
- Git for working with the course repository.
- Android Studio for opening, building, and running the Android app.
Before You Install Anything
When I set up a new machine for Android work, I do not clone the project immediately.
We need to check the two most basic tools for development first:
- Git: source control.
- Android Studio: IDE and toolchain.
It can feel a little slower at the start, but it will save you many hours of debugging later once you work more professionally.
Part 1: Install Git
- Git: the tool that lets you clone the course repository from Git remotes, inspect changes, and commit your work safely.
Official page: Git official install page.
GitHub, GitLab, and similar platforms are services that host code repositories.
Git is the tool installed on your machine. It helps you manage and communicate with GitHub and GitLab easily and safely.
Step 1: Download Git From The Official Page
Open the official Git install page and choose your operating system:
| OS | Recommended install path |
|---|---|
| macOS | Use the macOS option on the official page, or use Homebrew with brew install git if you already use Homebrew |
| Windows | Choose the Windows option from the official page and keep Git Bash enabled during install |
| Ubuntu/Debian | Run sudo apt update && sudo apt install git |
| Fedora | Run sudo dnf install git |
Step 2: Open A Fresh Terminal
After installation, close the old terminal and open a fresh one. This small step matters because the old terminal may not see the new PATH yet.
Run:
git --version
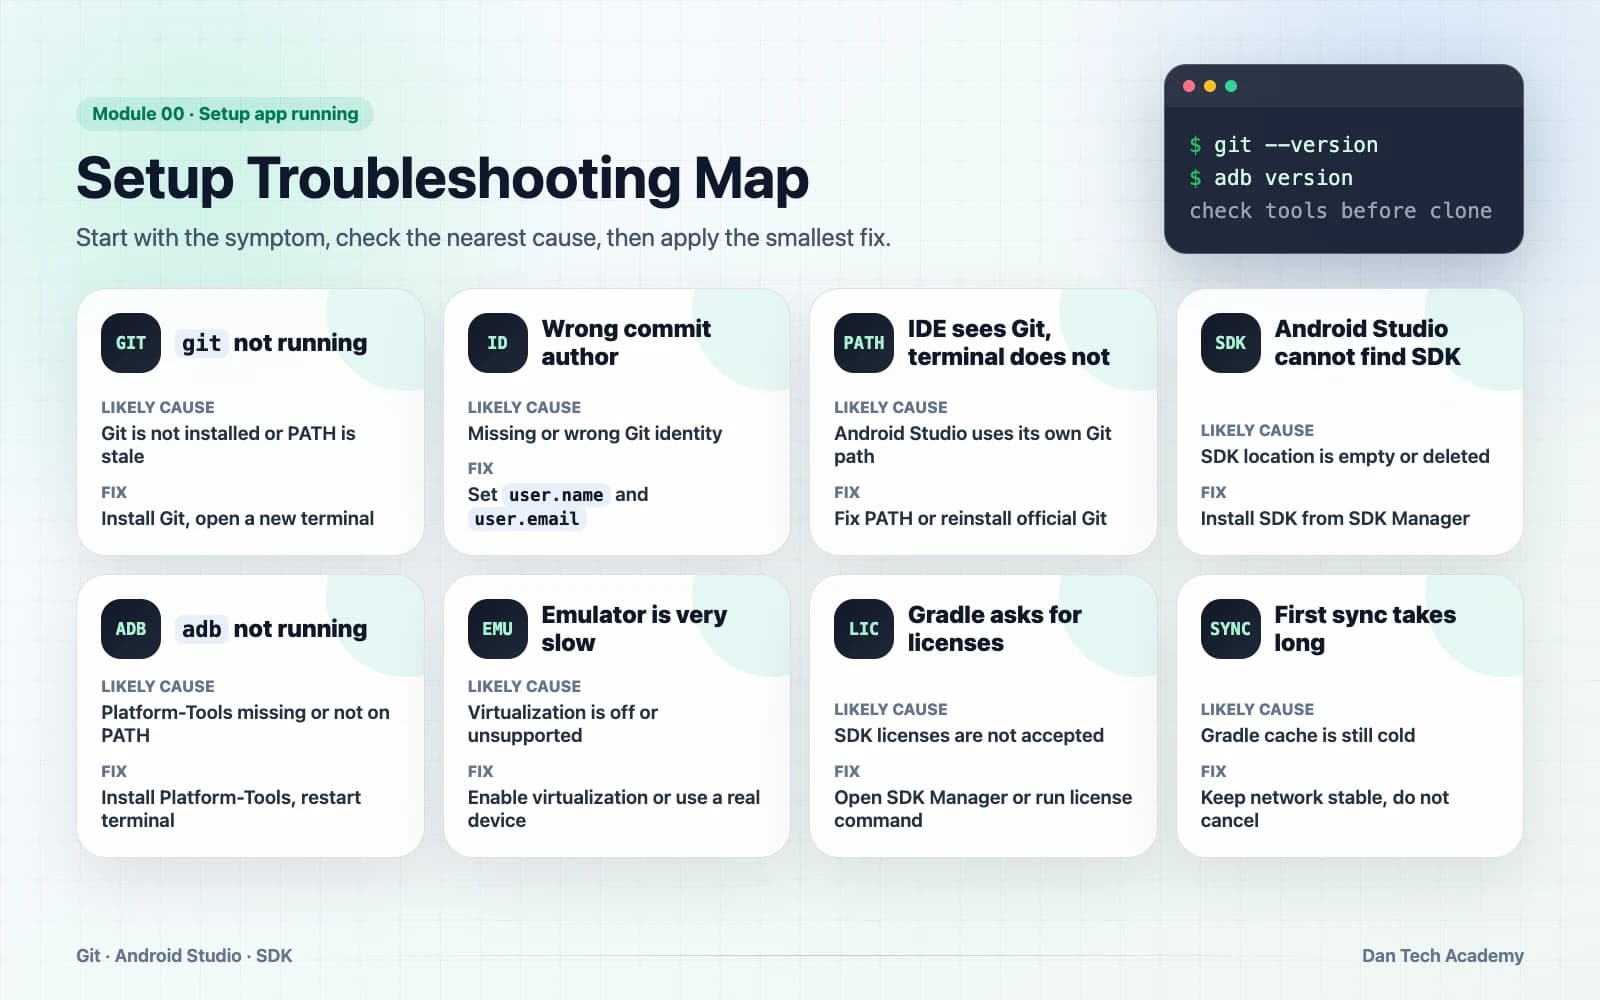
You should see a Git version printed in the terminal. If the terminal says command not found or 'git' is not recognized, Git is not fully installed or the terminal has not picked up the PATH.
The immediate fix is to restart your machine, then try the check again.
Step 3: Configure Your Git Identity
Now tell Git who you are, using your name and your email. This setup only needs to be done once when installing Git on a new machine. You only need the two commands below:
git config --global user.name "Your Name"
git config --global user.email "[EMAIL_ADDRESS]"
user.name: your name. You can choose any name you prefer.user.email: your email. You can choose any email you prefer.
This command does not log in to GitHub. It only controls the author information on your commits.
Step 4: Verify Git Is Ready
Run:
git --version
git config --global user.name
git config --global user.email
If those commands print sensible values, Git is ready for the next lesson.
Part 2: Install Android Studio And The Android SDK
- Android Studio: Google's official IDE for Android. It includes the Android SDK, emulator, device tools, Gradle integration, and code editor.
Official pages:
For this course, you should only use Android Studio stable unless you truly know why you need a preview build.
Step 1: Download The Stable Android Studio Installer
Go to the Android Studio download page and download the stable installer for your operating system. Do not download from unofficial websites.
If the download page shows a preview or canary version, skip it for now.
After the download finishes, install it using the default instructions for your operating system.
Step 2: Let The Setup Wizard Install The SDK
The first time Android Studio opens, the IDE may ask you to run a setup wizard. Let it install the standard Android SDK components. If it asks for standard or custom setup, standard is enough for this course.
The pieces you need are:
- Android SDK Platform
- Android SDK Build-Tools
- Android SDK Platform-Tools
- Android SDK Command-line Tools
- Android Emulator, if you plan to use an emulator
Step 3: Check SDK Manager Manually
After Android Studio opens:
- Open Android Studio.
- Go to
SettingsorPreferences. - Open
Languages & Frameworks > Android SDK. - Confirm that the Android SDK location is set.
- Open the
SDK Platformstab and install a recent stable Android platform if none is installed. - Open the
SDK Toolstab and install:- Android SDK Build-Tools
- Android SDK Platform-Tools
- Android SDK Command-line Tools
- Android Emulator, if you plan to use an emulator
Choose Runtime Target (Device Test)
You only need one target that can run.
For a real device:
- Enable Developer Options.
- Enable USB debugging.
- Connect the phone.
- Accept the trust prompt on the phone.
- Confirm Android Studio can see the device in the device picker.
For an emulator:
- Open Device Manager.
- Create a phone profile with a stable Android image.
- Start it once before opening the course project.
- Wait until the home screen is fully loaded.
Check Once With Terminal
After Git and Android Studio are installed, open a terminal and check the basic tools:
git --version
git config --global user.email
java -version
adb version
If git is not found, install Git first and restart your terminal. On Windows, also try Git Bash once; it gives you a predictable shell for course commands.
If adb is not found, open Android Studio once, install Platform-Tools, then restart your terminal. On macOS and Linux, the terminal only sees updated paths after a new shell starts.
You do not need to run ./gradlew yet because we have not cloned the course repository. That check belongs to the next lesson.
Troubleshooting Map
Checkpoint
Before moving to the next lesson, record your setup state:
git --version
git config --global user.email
java -version
adb version