

- Bài toán
- Tổng quan Kiến trúc
- Bước 1: HTML Template
- Bước 2: Thu thập Content
- Bước 3: Incremental Cache bằng Hash
- Bước 4: Vòng lặp Puppeteer
- Bước 5: Hero Screenshots (Nâng cao, Tuỳ chọn)
- Bước 6: Serving — URL Builder
- Bước 7: Upload lên CDN
- Pipeline được đóng gói
- Cấu trúc File
- Hiệu năng thực tế
- Trade-offs
- Khi nào dùng cách này vs. Runtime
Bài toán
Mỗi trang trên website cần một OG image. Chia sẻ blog post lên Twitter/LinkedIn mà không có ảnh preview → card trống trơn, nhìn rất nghiệp dư. Nhưng với 250+ trang, không thể tạo ảnh thủ công cho từng cái.
Vậy có những lựa chọn nào?
| Approach | Latency đầu tiên | Chi phí khi scale | Failure Mode |
|---|---|---|---|
| Vercel OG (Edge Runtime) | 3-5s cold start | ~$0.50/1K lần gọi | Serverless timeout với layout phức tạp |
@vercel/og (Satori) | Overhead mỗi request | ~$20/tháng compute | Tương tự — runtime = có thể lỗi |
| Runtime Puppeteer | 2-10s, không ổn định | Chi phí infrastructure | Bảo trì nặng |
| Build-time Puppeteer | 0ms (đã tạo sẵn) | $0 runtime | Static file = không thể crash |
Với blog/docs site — nơi content đã biết trước lúc deploy — build-time generation là lựa chọn rõ ràng nhất. Trả chi phí một lần lúc build, rồi serve static PNG từ CDN mãi mãi.
Tổng quan Kiến trúc
Pipeline gồm 4 lớp:
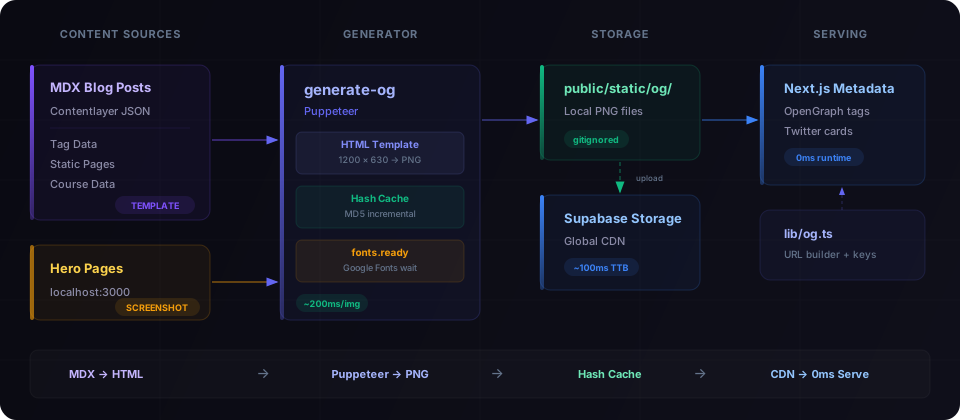
Hai chiến lược tạo ảnh:
Template-based — Blog posts, tags, courses, static pages. Render HTML template, Puppeteer chụp ảnh. ~200ms mỗi ảnh.
Hero screenshots — Trang chủ, landing pages, course pages. Puppeteer truy cập dev server thật và chụp UI thực tế. ~5-8s mỗi ảnh (chờ hydration).
Bước 1: HTML Template
Template render trang HTML 1200×630 để Puppeteer chụp. Không dùng ảnh, không dùng emoji — chỉ HTML/CSS thuần với Google Fonts.
Những quyết định thiết kế quan trọng:
- Dynamic font sizing — tiêu đề tự động scale theo số ký tự
- Tag-colored accents — primary tag quyết định màu gradient
- Google Fonts load qua CDN — Puppeteer chờ
document.fonts.ready - Không dùng ảnh hay emoji — CSS thuần, không bao giờ lỗi render
📄 Full template code — scripts/og/og-template.ts
// scripts/og/og-template.ts
export interface OgTemplateData {
title: string
tags: string[]
readTime: string
subtitle: string
}
function escapeHtml(str: string): string {
return str.replace(/&/g, '&').replace(/</g, '<').replace(/>/g, '>').replace(/"/g, '"')
}
function getTitleFontSize(title: string): number {
const len = title.length
if (len > 80) return 38
if (len > 60) return 44
if (len > 45) return 52
if (len > 30) return 60
return 68
}
function getTagColor(tag: string): string {
const map: Record<string, string> = {
android: '#3DDC84',
kotlin: '#7F52FF',
react: '#61DAFB',
nextjs: '#FFFFFF',
typescript: '#3178C6',
python: '#3776AB',
ai: '#10B981',
// Thêm tag → color mappings của bạn
}
return map[tag.toLowerCase()] || '#6366F1'
}
export function renderOgTemplate(data: OgTemplateData): string {
const title = escapeHtml(data.title)
const titleFontSize = getTitleFontSize(data.title)
const primaryColor = data.tags.length > 0 ? getTagColor(data.tags[0]) : '#6366F1'
// Tag pills với accent colors
const tagPills = data.tags
.slice(0, 3)
.map((tag) => {
const color = getTagColor(tag)
return `<span style="
padding: 7px 16px;
background: ${color}12;
border: 1px solid ${color}40;
border-radius: 8px;
font-size: 14px; font-weight: 700;
color: ${color};
text-transform: uppercase;
">${escapeHtml(tag)}</span>`
})
.join('')
return `<!DOCTYPE html>
<html>
<head>
<meta charset="utf-8">
<link href="https://fonts.googleapis.com/css2?family=Be+Vietnam+Pro:wght@400;700;900&display=swap" rel="stylesheet">
<style>
* { margin: 0; padding: 0; box-sizing: border-box; }
body {
width: 1200px; height: 630px; overflow: hidden;
font-family: 'Be Vietnam Pro', sans-serif;
background: #08080C; color: #F2F2F2;
position: relative;
}
/* Accent stripe - màu theo primary tag */
.accent-stripe {
position: absolute; left: 0; top: 0;
width: 5px; height: 100%;
background: linear-gradient(180deg, ${primaryColor}, transparent);
}
/* Gradient mesh tạo chiều sâu */
.mesh {
position: absolute; border-radius: 50%;
filter: blur(120px);
width: 800px; height: 800px;
top: -400px; right: -300px;
background: radial-gradient(circle, ${primaryColor}30, transparent 70%);
}
.container {
position: relative; z-index: 1;
display: flex; flex-direction: column; justify-content: center;
height: 100%; padding: 52px 72px 88px;
gap: 20px;
}
.tags-row { display: flex; gap: 8px; }
.title {
font-size: ${titleFontSize}px; font-weight: 900;
line-height: 1.08; max-width: 1000px;
letter-spacing: -0.02em;
}
.footer {
position: absolute; bottom: 0; left: 0; right: 0;
height: 56px; display: flex; align-items: center;
justify-content: space-between; padding: 0 72px;
border-top: 1px solid rgba(255,255,255,0.06);
}
.brand { font-size: 14px; font-weight: 700; color: #94A3B8; }
.domain { font-size: 14px; color: #475569; }
</style>
</head>
<body>
<div class="accent-stripe"></div>
<div class="mesh"></div>
<div class="container">
<div class="tags-row">${tagPills}</div>
<h1 class="title">${title}</h1>
</div>
<div class="footer">
<span class="brand">YOUR BRAND</span>
<span class="domain">yourdomain.com</span>
</div>
</body>
</html>`
}
Bước 2: Thu thập Content
Generator cần biết trang nào tồn tại. Đọc từ JSON output của Contentlayer và các data sources khác.
Chú ý quy ước đặt tên key: blog__nextjs__my-post-slug, tag__react, page__blog. Double underscore thay cho path separator. Tạo cấu trúc filename phẳng, dễ dự đoán trong public/static/og/.
📄 Content loaders — blog, tags, static pages
// scripts/og/generate-og.ts (phần load content)

interface OgEntry {
  key: string // Cache key và filename (không có .png)
  data: OgTemplateData // Input cho template
}

/** Load blog posts tiếng Anh đã publish từ Contentlayer */
async function loadBlogEntries(): Promise<OgEntry[]> {
  const dir = join(ROOT, '.contentlayer/generated/Blog')
  if (!existsSync(dir)) return []

  const files = await readdir(dir)
  const entries: OgEntry[] = []

  for (const file of files.filter((f) => f.endsWith('.mdx.json'))) {
    const post = JSON.parse(await readFile(join(dir, file), 'utf-8'))
    if (post.language === 'en' && !post.draft) {
      entries.push({
        key: `blog__${post.slug.replace(/\//g, '__')}`,
        data: {
          title: post.title,
          tags: post.tags || [],
          readTime: post.readingTime?.text || '',
          subtitle: '',
        },
      })
    }
  }
  return entries
}

/** Load tag pages từ tag-data.json */
async function loadTagEntries(): Promise<OgEntry[]> {
  const tagFile = join(ROOT, 'app/tag-data.json')
  if (!existsSync(tagFile)) return []
  const tags = JSON.parse(readFileSync(tagFile, 'utf-8'))

  return Object.entries(tags).map(([tag, count]) => ({
    key: `tag__${tag}`,
    data: {
      title: `#${tag}`,
      tags: [],
      readTime: '',
      subtitle: `${count} bài viết`,
    },
  }))
}

/** Static pages với OG content cố định */
function getStaticPageEntries(): OgEntry[] {
  return [
    { key: 'page__blog', data: { title: 'Blog', tags: [], readTime: '', subtitle: 'Bài viết Tech' } },
    { key: 'page__tags', data: { title: 'Tags', tags: [], readTime: '', subtitle: 'Duyệt theo chủ đề' } },
    // ... thêm static pages
  ]
}
Bước 3: Incremental Cache bằng Hash
Đây là phần quan trọng nhất. Không có cache, mỗi build tạo lại toàn bộ 250+ ảnh (~2 phút). Có cache, chỉ content thay đổi mới tạo lại.
Ý tưởng đơn giản: hash các inputs của template (title, tags, readTime) → so sánh với hash trước đó → skip nếu giống nhau.
function computeHash(data: OgTemplateData): string {
  const content = `${data.title}|${data.subtitle}|${data.tags.join(',')}|${data.readTime}`
  return createHash('md5').update(content).digest('hex')
}

// Incremental: chỉ regenerate content đã thay đổi
if (cache[key] === hash && existsSync(outputPath)) {
  continue // Cache hit: ~5ms thay vì ~200ms
}
Kết quả: Sửa một blog post → chỉ tạo lại một ảnh. Build incremental: +30s thay vì +2 phút.
📄 Full cache implementation
import { createHash } from 'node:crypto'

const CACHE_FILE = join(ROOT, '.og-cache.json')

type CacheMap = Record<string, string> // key → MD5 hash

function computeHash(data: OgTemplateData): string {
  const content = `${data.title}|${data.subtitle}|${data.tags.join(',')}|${data.readTime}`
  return createHash('md5').update(content).digest('hex')
}

function loadCache(): CacheMap {
  if (!existsSync(CACHE_FILE)) return {}
  try {
    return JSON.parse(readFileSync(CACHE_FILE, 'utf-8'))
  } catch {
    return {}
  }
}

// Vòng lặp so sánh cache
const cache = loadCache()
const newCache: CacheMap = {}
const toGenerate: OgEntry[] = []

for (const entry of allEntries) {
  const hash = computeHash(entry.data)
  newCache[entry.key] = hash
  const outputPath = join(OUTPUT_DIR, `${entry.key}.png`)

  // Skip nếu hash khớp VÀ file tồn tại trên disk
  if (cache[entry.key] === hash && existsSync(outputPath)) {
    continue // Cache hit: ~5ms thay vì ~200ms
  }
  toGenerate.push(entry)
}
File .og-cache.json nên nằm trong .gitignore — nó là build artifact local.
Bước 4: Vòng lặp Puppeteer
Core loop: render HTML template → load vào Puppeteer → chờ fonts → chụp ảnh.
Chi tiết quan trọng: Phải chờ document.fonts.ready. Nếu không, Puppeteer chụp trước khi Google Fonts load xong → hiện font hệ thống fallback, nhìn rất xấu. Timeout 5 giây là safety net cho CI environments khi font CDN phản hồi chậm.
📄 Puppeteer generation code
const browser = await puppeteer.launch({
  headless: true,
  args: ['--no-sandbox', '--disable-setuid-sandbox'],
})

const page = await browser.newPage()
await page.setViewport({ width: 1200, height: 630 })

for (const entry of toGenerate) {
  // 1. Render template HTML
  const html = renderOgTemplate(entry.data)

  // 2. Load vào Puppeteer
  await page.setContent(html, { waitUntil: 'domcontentloaded' })

  // 3. Chờ Google Fonts load (có timeout fallback)
  await Promise.race([page.evaluate(() => document.fonts.ready), new Promise((resolve) => setTimeout(resolve, 5000))])

  // 4. Chụp ảnh
  const outputPath = join(OUTPUT_DIR, `${entry.key}.png`)
  await page.screenshot({ path: outputPath, type: 'png' })
}

await browser.close()
saveCache(newCache)
Bước 5: Hero Screenshots (Nâng cao, Tuỳ chọn)
Với những trang có hero visual phong phú (landing pages, course pages), template không thể capture được UI thực. Thay vào đó, chụp từ dev server đang chạy.
Cần yarn dev đang chạy ở localhost:3000. Nếu dev server không chạy, hero screenshots sẽ bị skip — chỉ tạo ảnh template-based.
📄 Hero screenshot implementation
const HERO_PAGES = [
  { key: 'page__home', url: '/', delay: 2000 },
  { key: 'page__kotlin-accelerator', url: '/kotlin-accelerator', delay: 5000 },
  {
    key: 'course__kotlin-accelerator',
    url: '/courses/kotlin-accelerator',
    delay: 8000,
    waitForText: 'Your path to', // Chờ content cụ thể
  },
]

async function generateHeroImages(page: Page): Promise<number> {
  // Force dark mode
  await page.emulateMediaFeatures([{ name: 'prefers-color-scheme', value: 'dark' }])

  for (const hero of HERO_PAGES) {
    await page.goto(`http://localhost:3000${hero.url}`, {
      waitUntil: 'load',
      timeout: 30000,
    })

    // Chờ hydration
    await new Promise((resolve) => setTimeout(resolve, hero.delay))

    // Ẩn dev overlays, header, footer
    await page.evaluate(() => {
      const style = document.createElement('style')
      style.textContent = `
        nextjs-portal, header, footer { display: none !important; }
        * { animation-duration: 0.001s !important; }
      `
      document.head.appendChild(style)
    })

    await page.screenshot({
      path: join(OUTPUT_DIR, `${hero.key}.png`),
      type: 'png',
    })
  }
}

// Kiểm tra localhost dev server có đang chạy không
async function isLocalhostAvailable(): Promise<boolean> {
  try {
    const controller = new AbortController()
    setTimeout(() => controller.abort(), 3000)
    await fetch('http://localhost:3000', { signal: controller.signal })
    return true
  } catch {
    return false
  }
}
Bước 6: Serving — URL Builder
Page metadata cần resolve đúng URL ảnh OG. Dev dùng từ public/, production dùng từ CDN (Supabase Storage).
📄 URL builder — lib/og.ts
// lib/og.ts

import siteMetadata from '@/data/siteMetadata'

export function buildStaticOgImageUrl(key: string): string {
  const supabaseUrl = process.env.NEXT_PUBLIC_SUPABASE_URL
  if (supabaseUrl && process.env.NODE_ENV === 'production') {
    // Production: Supabase Storage CDN
    return `${supabaseUrl}/storage/v1/object/public/og/${key}.png`
  }
  // Development: file local
  return `${siteMetadata.siteUrl}/static/og/${key}.png`
}

// Key helpers khớp với naming convention của generator
export const ogKey = {
  blog: (slug: string) => `blog__${slug.replace(/\//g, '__')}`,
  tag: (tag: string) => `tag__${tag}`,
  course: (slug: string) => `course__${slug.replace(/\//g, '__')}`,
  page: (name: string) => `page__${name}`,
}
Sử dụng trong Next.js page metadata:
// app/blog/[...slug]/page.tsx
import { buildStaticOgImageUrl, ogKey } from '@/lib/og'

export async function generateMetadata({ params }) {
  const slug = params.slug.join('/')
  return {
    openGraph: {
      images: [{ url: buildStaticOgImageUrl(ogKey.blog(slug)) }],
    },
    twitter: {
      card: 'summary_large_image',
      images: [buildStaticOgImageUrl(ogKey.blog(slug))],
    },
  }
}
Bước 7: Upload lên CDN
Sau khi tạo xong, upload lên Supabase Storage để CDN phân phối toàn cầu:
📄 Upload script — scripts/og/upload-og.ts
// scripts/og/upload-og.ts

import { createClient } from '@supabase/supabase-js'

const supabase = createClient(process.env.NEXT_PUBLIC_SUPABASE_URL!, process.env.SUPABASE_SERVICE_ROLE_KEY!)

const files = readdirSync(OG_DIR).filter((f) => f.endsWith('.png'))

for (const file of files) {
  const fileBuffer = readFileSync(join(OG_DIR, file))

  await supabase.storage.from('og').upload(file, fileBuffer, {
    contentType: 'image/png',
    upsert: true, // Override lần upload trước
  })
}
Pipeline được đóng gói
Hai npm scripts, chạy tuần tự:
# Tạo tất cả ảnh template + hero screenshots (nếu dev server đang chạy)
yarn build:og

# Upload lên Supabase Storage CDN
yarn upload:og
{
  "scripts": {
    "build:og": "tsx scripts/og/generate-og.ts",
    "upload:og": "tsx scripts/og/upload-og.ts"
  }
}
Đừng quên .gitignore:
public/static/og/
.og-cache.json
Cấu trúc File
scripts/og/
├── generate-og.ts    # Generator chính + cache logic
├── og-template.ts    # HTML template renderer
└── upload-og.ts      # Uploader lên Supabase Storage

lib/
└── og.ts             # URL builder + key helpers

public/static/og/     # PNGs được tạo (gitignored)
.og-cache.json        # Hash cache (gitignored)
Hiệu năng thực tế
| Metric | Giá trị |
|---|---|
| Tạo ảnh template | ~200ms mỗi ảnh |
| Hero screenshot | ~5-8s mỗi ảnh (chờ hydration) |
| Full build (250 ảnh) | ~2 phút |
| Incremental build (1 thay đổi) | ~30 giây |
| Cache skip | ~5ms mỗi entry |
| CDN delivery | ~100ms toàn cầu |
| Chi phí runtime | $0 |
Trade-offs
| Được | Mất |
|---|---|
| Zero runtime cost mãi mãi | Build ban đầu chậm hơn |
| CDN delivery tức thì (~100ms) | Không tạo ảnh dynamic per-user |
| 100% reliability (static files) | Cần Node.js trong CI |
| Incremental builds qua cache | Kích thước cố định 1200×630 |
| Template thay đổi = rebuild toàn bộ | Template chỉ đổi khi design thay đổi |
Khi nào dùng cách này vs. Runtime
Dùng build-time nếu:
- Content đã biết trước lúc deploy (blog, docs, courses)
- Ảnh không cần personalization theo user
- Muốn zero chi phí runtime
- Reliability > flexibility
Dùng runtime nếu:
- Ảnh cần dữ liệu user-specific (profile cards, certificates)
- Content thay đổi real-time giữa các lần deploy
- Chấp nhận serverless cold-start latency
- Cần nhiều kích thước ảnh dynamic
Infrastructure tốt nhất là loại deploy xong rồi quên. Build-time OG generation với Puppeteer chính là vậy — 250 ảnh được tạo, cache, upload CDN, và serve ở tốc độ static file.